Professional Series Pond Free Waterfall Installation Instructions

Home / Resources / Instructions

American Pond Free Waterfall Kit Instructions

For Professional Grade Waterfall and Stream Kitsprint

Congratulations on your purchase of an American Pond Professional grade Pond Free Waterfall Kit. American Pond utilizes the latest technological advances in pond products in order to put together the best possible equipment for your kit at the most economical prices possible.

Your American Pond Professional Grade Waterfall kit has been carefully packed and the items verified before shipment.

Your kit will contain the following items:

  • 10’x12’ section of 45 Mil EPDM Liner – Waterfall and stream kits come with 10’x20’ liners
  • 10’x10’ non woven geotextile underlayment fabric
  • A heavy duty direct drive pond pump or energy efficient magnetic hybrid pump - depending on the model you purchased. Pump sizes vary by model purchased.
  • Tubing and plumbing assembly: Heavy duty flexible PVC tubing, primer, PVC glue, and a plumbing assembly with check valve
  • Waterfall Spillway: Closed top spillway for easy rock concealment - varying size according to model ordered
  • Pump Vault: size varies according to model ordered.
  • Medium waterfall kits and above come include an auto fill device
  • 1 can of black rock foam is included. Depending upon your installation and kit additional cans may be desired.
  • 1- 8oz container of Waterfall cleaner is included
  • 1 tube silicone sealant

This guide will assist you in installing and maintaining your new pond free waterfall kit. If you have any questions not covered in this material please feel free to contact your American Pond dealer direct or call customer service at 954-746-0033 and speak with a knowledgeable pond installer.

Tools Needed For American Pond Waterfall Kit Installation:

Required Tools:

  • Shovel
  • Adjustable Wrench – Channel lock
  • Nail or awl – Freedom kit only
  • Handsaw or PVC cutter
  • Phillips head screw driver

Optional Tools:

  • Hand Tamp – large flat weight on end of tall handle
  • Level
  • Utility knife
  • Spray paint, string, or garden hose

STEP 1: Selecting the Location for Your Waterfall

Selecting where your waterfall will be placed is an important step that should not be hurried. If you will be viewing from a deck or porch then try to place the waterfall in a position where it affords the greatest viewing angle. Consider a location that is visible from your kitchen or dining room window as well.

  • TIPS:Do not place directly under a tree if at all possible. The roots will make digging harder and they may eventually damage the liner. Leaves in the fall will require frequent cleanouts.
  • The middle of a flat backyard may not be best either. No shade can lead to algae growth during the summer. Aesthetically, a sudden mound popping out of the middle of a flat yard with no surrounding vegetation would look very unnatural.
  • If your yard is has a hill sloping in the direction you wish the waterfall to run that may be a location to consider. If your yard is flat try to choose a location that is partially shaded during the day.
  • BEFORE YOU DIG: Before choosing your final location or doing any you must find out where your plumbing and electrical lines are buried. Calling 811 before you dig will notify your local utility companies and within a few days they will arrive to mark out your plumbing, phone, and electrical lines. Visit http://www.call811.com for more information.

    STEP 2: Marking Out the Basin and Waterfall/Stream

    marking out basin and waterfall stream

    Once you have determined where you would like to place the feature you will want to mark out the position of the waterfall, the basin, and the stream if your model includes one. The best way to do this is with a can of marking spray paint from your local hardware store.

    You can also use your garden hose or even string to mark out the position for digging.

    The size of your basin area should be 4.5 ft x 4.5 ft x 24 inches deep

  • TIP: Ensuring that your waterfall has plenty of water is important. Evaporation and splashing can drop the level of water in your basin quickly. One option to increase the amount of water in your basin is to fill the bottom of the basin with American Pond Basin Cubes. These heavy duty high impact resin cubes allow water to pass through but will keep out rocks. This allows you to use less rock for your basin and to add considerably to the amount of water your basin will hold. For example: One cubic foot of basin will hold 7.48 gallons of water. One cubic foot of rock filled basin will hold about 2.2 gallons of water.
  • The American Pond Basin cubes are available from your American Pond dealer.

    Pond Free Waterfall Kits With Stream:

    Using the measurements above for the basin and assuming your waterfall will be 4 foot tall you will have approximately 6-7 foot remaining for a small stream. If you reduce the height of your waterfall you can increase the length of your stream by and equal amount. Example: A 2 foot tall waterfall would allow for an 8-9 foot stream. Additional liner lengths are available for longer custom streams. Other upgrades may be required to properly accommodate a longer stream. Additional tubing, a larger pump vault or a stronger pump may be needed for a custom stream length.

    STEP 3: Excavating and Waterfall Building

    When digging the hole for the water basin you will want to keep the sides straight and the bottom level.

    The walls of your basin should be of equal height to prevent water from flowing out the lowest side when full. Place a 2x4, or other straight board, across the top of the basin walls. By placing a level in the center of the board you can determine when each side is of equal height and excavate as needed to achieve this.

    Make sure that all sharp rocks are removed from the bottom and sides of basin.

    If working with very rocky soil you may wish to add approximately 2 inches of sand to the bottom. This will help cushion the liner from the rocks and make leveling very easy.

  • TIP: One tiny corner of the basin should be 2 inches lower than the others in order to easily conceal the tubing that will run from the basin to the top of the waterfall.
  • If your waterfall will be installed on a hillside you may not need to save the dirt from the basin excavation. It can be spread out in the yard, used to fill low areas, or hauled away.
  • Building a raised waterfall on flat ground will require you to utilize the soil taken from the basin.
  • Instead of simply mounding up the dirt into a steep pyramid shape you may want to consider building up the waterfall area in different levels. The use of various size large rocks or boulders can make a perfect retainer for building up your waterfall mound in a terraced manner.

    The planned height of your waterfall will depend upon the total amount of dirt or fill needed to complete the terraced mound. Additional dirt may be needed to make the waterfall area look natural. Above all else you want to avoid your waterfall looking like a giant ant mound popping out of a flat yard. That would not look natural and will detract greatly from the beauty of the completed waterfall.

  • TIP:It is important that the dirt on your waterfall area be compacted as much as possible so the least amount of settling happens. There are machines available to do this for you or you can use a weighted hand tamp which is available from almost any hardware store. Some customers will choose to simply jump up and down on the dirt on smaller projects.
  • A waterfall area that is not compacted may see shifting pond liner and the waterfall spillway may tilt to the left/right or back/front. These are time consuming errors to fix so make sure your waterfall soil moves as little as possible.
  • If your American Pond brand waterfall kit comes with a stream you will want to excavate it at this time. Removing about 6 inches will provide you enough depth to contain your stream and any rocks you add to the stream bed. Deeper areas can be added where water may pool up if desired. This will mirror natural streams. Just remember to avoid any sharp turns in the stream to prevent splashing and water loss.

    STEP 4: Installing the Pond Liner and Underlayment

    Once the basin has been dug and the waterfall area is the correct height it is time to install the underlayment and pond liner.

    First, unroll the 10ft x 10ft (8ft x 10ft for the mini kit) section of pond liner underlayment and position it evenly over the hole dug for your basin. Step into the basin itself and using your hands or feet work the underlayment against the walls of your basin. When completed the underlayment should be fairly flat across the bottom and up the sides. It is not necessary to get out every wrinkle in the underlayment as it will be covered by the pond liner. The underlayment will be slightly larger than the basin itself and you can allow the extra material to overhang the ground outside the basin.

    NOTE: The pond liner underlayment is smaller than the pond liner for your waterfall kit. The protective underlayment increases the puncture resistance of your pond liner by 400% and adds an extra layer of protection to the pond liner in the basin. The weight of the water over the face of the waterfall or stream is very minimal so underlayment material under the liner is not required for that portion of the feature.

    After the underlayment has been placed in the basin it is time to spread the pond liner over the feature. Starting at the basin you will roll out the liner. Care should be taken to keep the liner flat against the basin walls and bottom. Run the remainder of the liner across the waterfall feature and work into the depression of any stream bed and tuck neatly into the form of any steps or terraces you have created in the waterfall.

    The placement of the liner above the basin is critical. Properly smoothing it out will allow you to more easily lay in decorative rock as well as hold the water inside the boundaries of the waterfall and stream.

    Do not stretch the liner in order to make it to the top of your waterfall. The liner should rest easily on the contour of your waterfall or stream. Stretching the liner to reach a certain extra distance will result in the shifting of your feature and waterfall spillway once the weight of the rocks and water is added.

    The pro kit the spillway will sit on top of the liner. Lay liner in a manner that will allow enough room for it to go under and up the back side of the spillway where it will attach.

    STEP 5: Placing the Pump Vault and Pump

    After the liner has been placed on the waterfall and fitted properly it is time to install the equipment. The pump vault goes in first. Place the pump vault inside the basin at the location that will be easiest for you to access when you need to service the pump. Leave 8 inches from the pump vault to the wall of the basin to allow water to be drawn in from all sides of the vault.

    The pump vault will sit on the bottom of the basin and will come to just underneath the top of the basin when dug to the recommended height from step #2. Later you will fill in the basin with gravel or river rock and the lid of the pump vault will be lightly covered with stone but will be shallow enough to be readily accessible when you need to service the pump.

    Your waterfall pump should now be set into the pump vault. The pump vault protects the pump from the surrounding gravel that will be used and will still allow you access to the pump for removal or servicing.

    A check valve assembly comes with the American Pond Pro kit and includes a rubber coupler which allows you to easily remove the pump and assembly from the vault. The assembly has been hand fitted together for reference but parts will need to be glued permanently with the included PVC primer and glue.

    The assembly comes with lengths of PVC tubing in the assembly. To determine the best fit for your particular model waterfall kit you will attach the assembly into pump outlet at the bottom of the pump vault. Do not glue at this time!

    Measure the assembly and using a PVC cutter or a handsaw cut the lengths of the PVC tubing in the lengths needed for the assembly end to reach the pump vault tubing hole.

    Once you are satisfied with the positioning of your assembly proceed to glue each length of cut tubing into the corresponding slip fitting outlet. Using the included PVC primer and glue you will first prime the outside edge of each length of tubing as well as the inside of each plastic fitting. Once the fittings are primed you will apply glue and attach. Press the tubing firmly into the fitting and hold for about 10 seconds. The glue dries very quickly so it is recommended that you glue only one fitting at a time.

  • TIP: Many professional pond contractors prefer slightly different configurations in their assemblies. Using the assembly parts and tubing lengths included several variations can be made. The diagram indicates only the most common assembly.
  • The end of the assembly with rubber coupler attaches to the long section of flexible PVC tubing included with your kit. Do NOT glue the rubber coupler as this will be how your pump and assembly are removed for cleaning or winter storage. Tighten the clamp on the rubber coupler over where it attaches to the PVC tubing and your pump and assembly will be complete.

    American Pond brand professional medium and larger waterfall kit will include an auto fill device. This mounts to the inside of the pump vault. A connection for a garden hose or other tubing is provided. The auto fill device is an automatic control that will fill your pond basin when the water level gets too low. With its float switch and valve system the unit will also turn off the water supply once the basin is filled. If using this device you will need to make arrangements to run your water hose or tubing from your water supply to the auto fill valve in the pump vault. Burying the hose is suggested in order to keep your waterfall looking natural.

    STEP 6: Lay Out the Tubing

    Once the pump and assembly are attached you are ready to lay out the tubing for your water feature. Your kit will include a length in excess of what you will need for a standard installation. Uncoil your tubing and lay it along a path outside the waterfall or stream. Measure the length needed to easily reach your waterfall spillway. Run the tubing in the most direct path possible and avoid any sharp turns as they will lessen the speed the water travels to your waterfall.

    Once you are satisfied your tubing is in the best possible position you are ready to bury the tubing. Burying the tubing will keep your tubing from being visible and detracting from the natural appearance of your waterfall. It will also insulate the tubing from light freezes as well as protect the tubing from the degrading effect of exposure to the sun.

    Dig a trench 4-6 inches below the level of the ground and wide enough to easily fit the tubing inside. Do not bury the tubing at this time as you will want to use it in a later step as you wash down your decorative rocks.

    STEP 7: Attaching the Waterfall Spillway

    One of the most critical steps in building your waterfall is the placement of the waterfall spillway. It is very important that the dirt the spillway sits on will not shift over time. You will want to make sure the spillway is perfectly level side to side. The use of a level can make this step easier but it is not required.

    Your professional waterfall kit spillway comes with a closed top that prevents water from escaping in any direction other than forward. The pro model spillway will sit directly on top of the liner. Place the spillway level from left to right to ensure a beautiful sheet of water coming from the spillway. Fold back a small section of the pond liner in order to adjust the soil and compact as needed when leveling.

    After determining the spillway is in the ideal position and it is level remove the unit and replace the pond liner being careful not to disturb the leveled soil.

    You may place 1 or 2 large stones on top of the spillway to hold it in the proper position.

    Place the liner up against the backside of the spillway to make sure you will have a proper fit. Do not pull tight! Leave some slack below the spillway fitting to prevent any strain or pulling on the liner connection. Make sure the liner and back of the spillway are clean of debris and lay the liner back down.

    silicone sealant use on spillway

    Using the included silicone sealant run a continuous bead across the circle of screw holes on the back of the spillway.

    Attach the circular compression fitting to the back of the spillway starting with the top screw. Use a nail or awl, if needed, to poke a hole through the liner before inserting screws. Loosely insert all screws on the compression fitting before tightening. Only tighten till the compression is snug against the liner. Over tightening can strip out the screws or crack the fitting.

    attaching the spillway

    Apply a small amount of silicone sealant to the threads of the plumbing fitting and insert into the back of the spillway. Tighten with wrench to just past hand tight. Do NOT glue tubing into place at this time.

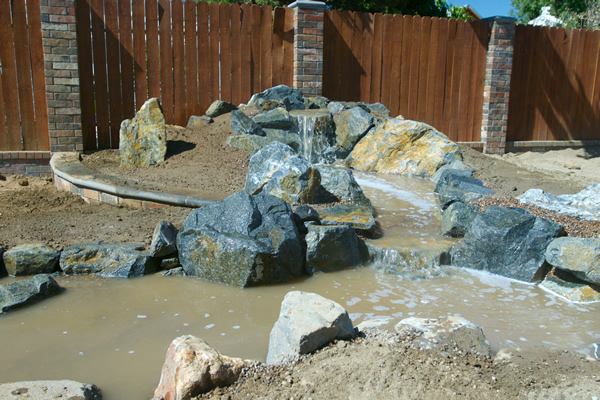
    STEP 8: Rocking the Waterfall

    rocking the waterfall

    At this point the assembly of your American Pond waterfall kit equipment is complete and the process of adding rock to your waterfall and basin begins. Start at the waterfall and work your way to the basin.

    placing the rocks to look natural

    You will want at least 3 different types and sizes of rock for your project. 1. Large rocks or small boulders for the waterfall or stream will add character and make the feature look more natural. 2. Small to medium size rocks to build up the sides of the waterfall or stream and to fill in the bottom of the basin. 3. Gravel or small river rock to fill in exposed areas of liner in the waterfall or stream and to top off the basin.

    The rocks for the face of your waterfall and stream are a matter of personal preference. It should be noted that the most nature looking waterfalls follow some simple guidelines.

    Choose two very large rocks of slightly different sizes for each side of your waterfall spillway.

    Use the least amount of rocks stacked on top of each other to create a more natural look.

    Choose varying size rocks/small boulders (6-18 inch) for the sides of your stream. What you are trying to avoid is having all rocks looks the same color and size. That would make a very unnatural looking water feature.

    A natural looking stream will not have a string of rocks lining it. Alternate between rocks, grass, mulch, dirt and gravel for the most natural looking stream. Consider locating plants that meet or overhang the edge of the stream.

    In nature you will see rocks of all shapes and sizes in mountain streams. Leave some rocks in the center of your waterfall or stream sticking out above the water. This divides the flow of water and is very realistic looking.

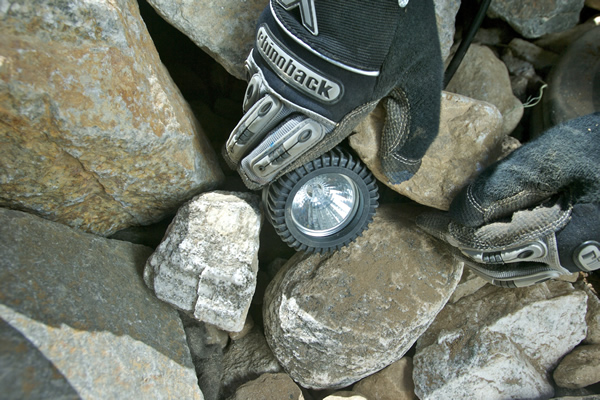
    If you have purchased low voltage underwater lighting place them in the waterfall or stream at this time.

    Install underwater lighting

    Try to place the light body in between two or more rocks pointing out. This will conceal the light from view during daylight hours. Lights at the base of the waterfall pointing up are popular and allow you to continue viewing the falling water after dark.

    Using the foam on gravel

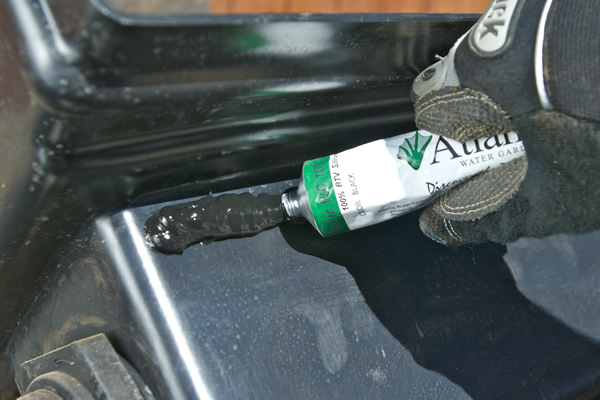
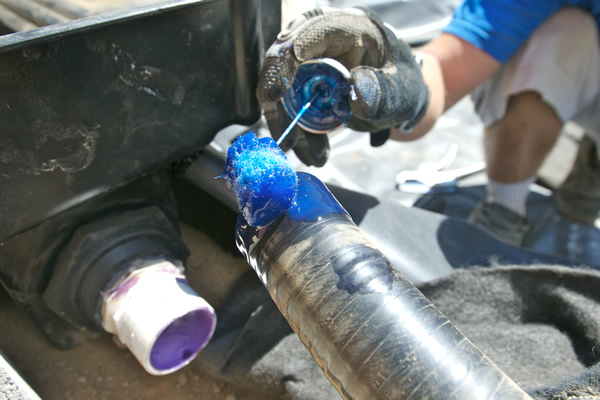
    Use the can of rock foam that is included with your kit to fill in cracks between stacks of rocks. Use foam where flat rocks meet the liner to keep the water flowing above them.

  • TIP: When filling any cavity with the pond foam it is important to remember to only fill to 1/3 of the capacity. The foam will continue to expand and if you overfill you will have foam oozing out everywhere.
  • This foam is very sticky and it will forever ruin cloths that it touches! Wear gloves and old cloths when applying. Foam that gets on your skin will wear off in a week or two.
  • On areas that are foamed you may want to toss a handful of gravel or river rock. The gravel will stick to the foam and cover up the exposed foam. Foam is black upon application but if left exposed to the sun it will turn a yellowish brown over time. It is best to conceal foam with rocks or gravel while it is wet.
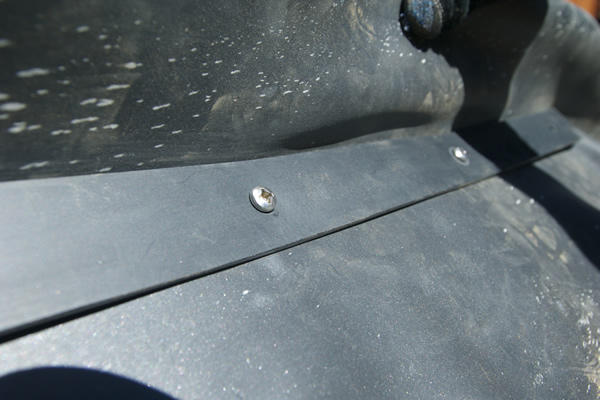
  • Foam will dry within 12 hours and any excess foam that is protruding out can be cut off with a utility knife at that time.
  • You may choose to utilize flat rocks on the different levels of your waterfall to create extended drops that add both sound and visual pleasure to your feature.

    When filling your basin larger river rock or cobblestones can be put into the basin first with more expensive or nicer looking smaller river rock on top.

    Larger rocks can be set randomly on top of the rock filled basin to create a natural look.

    If using American Pond Basin Cubes for your structure even heavy boulders can be placed upon them for added appeal.

    STEP 9: Wash Down Rocks

    Once you have placed all the rocks and gravel on your waterfall, stream, and basin and your pond foam is dry you will want to use a hose to wash them down. This step will help clear out all the gravel dust and make your waterfall run clear faster.

    When the rocks have been washed down the cloudy water will all have settled into the basin. Lay the tubing for your feature so the water will drain to a convenient location in your yard. Turn on the pump and allow the cloudy water to discharge into the yard. Be careful that you do not run the pump dry as it will damage it.

    STEP 10: Attach Tubing

    After the rocks have been washed and the basin drained of the cloudy water it is time to attach the tubing to your waterfall spillway. Bury the tubing at this time and then proceed to the correct model instructions below.

    Now is the time that you may cut off excess tubing. Just make sure you do not cut it too short and you leave a little slack in the tubing in case adjustments need to be made.

    PVC Glue

    When the adapter fitting is securely fastened use the PVC primer and then the PVC glue on both the inside of the adapter and the outside of your tubing. Quickly insert the tubing into the fitting and hold for about 10 seconds. With the tubing now attached backfill in behind the spillway to further help hold it in place.

    Congratulations: Your American Pond Pro-Series Pond Free Waterfall kit is now complete!

    You may now proceed to fill the basin fully with water. Once full, turn on the pump and see the results of all your hard work. As the water flows over the face of the waterfall and through any stream you may have keep you may wish to adjust any loose rocks. Check for areas that may have water splashing out of the confines of the feature and adjust rocks or backfill under liner to change the flow pattern as needed. Backfill behind waterfall spillway to help hold unit in place.

    Now that your waterfall is complete you will want to think about how to decorate the sides of the stream, the waterfall mound, and the surrounding area. Planting the waterfall mound/berm is very important both to create a natural appearance as well as to ensure that heavy rains do not wash away the soil.

    Your local landscape store will have a variety of plants that will enhance the appearance of your waterfall and stream. Ivy, ferns, and grasses all make wonderful additions. Consider plants of varying sizes in order to create a layered natural look to your feature.

    Thank you again for your purchase of an American Pond brand Waterfall kit. We hope it will be the highlight of your yard for many years to come.

    Back to Top